• Sign Up! To view all forums and unlock additional cool features

    Welcome to the #1 Dodge, Jeep and RAM Forum dedicated to FCA owners and enthusiasts. Register for an account, it's free and it's easy, so don't hesitate to join the SRT Forum today!


Broken stud on header to CAT connection

Alain

Active Member
Member ID
#2176
Messages
166
Reactions
135
Likes
37
City
Haskell
State
NJ
Country
United States
Vehicle
2016 Challenger Hellcat
#1
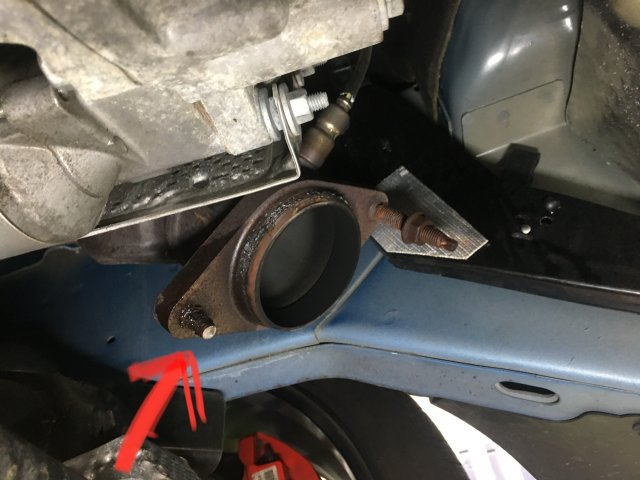
As the title states boys. I snapped one of the studs while removing my exhaust to do a 3.90 diff swap on my M6 Challenger.

two questions.

1- does anyone know if those studs are pressed in or screwed in?

2- if pressed in, anyone have any pointers on how to press it out WITHOUT taking the header off the car?


I think they are screwed in because the end of the stud has what looks like and external torx end on it which I assume is there to aid in install and removal of the stud.

I appreciate any help you guys can give me.
0BEFDD91-12C1-40A3-BDB4-B8B84D9AB726.jpeg


Last edited:

vortecd

Poster Club Hall of Fame
Premium Account
Donating Member
9 Second Best E/T
HFCOTM
Member ID
#1248
Messages
52,846
Reactions
175,141
Likes
402
City
Middleville
State
MI
Country
United States
Vehicle
2016 Charger Hellcat
#2
They are screwed in, I have had them out before. I would spray some kind of break away oil on them. You may also need to heat them up to get them out. I have been meaning to order a spare set. One of mine is a little messed up from the cat delete pipes I had on


vortecd

Poster Club Hall of Fame
Premium Account
Donating Member
9 Second Best E/T
HFCOTM
Member ID
#1248
Messages
52,846
Reactions
175,141
Likes
402
City
Middleville
State
MI
Country
United States
Vehicle
2016 Charger Hellcat
#3
I don't know if I would even change the gears from a 3.70 to a 3.90. My auto went from a 2.62 to 3.09 so enough I felt it was worth while


OP
Alain

Alain

Active Member
Member ID
#2176
Messages
166
Reactions
135
Likes
37
City
Haskell
State
NJ
Country
United States
Vehicle
2016 Challenger Hellcat
Thread Starter #4
They are screwed in, I have had them out before. I would spray some kind of break away oil on them. You may also need to heat them up to get them out. I have been meaning to order a spare set. One of mine is a little messed up from the cat delete pipes I had on
its GREAT news to hear they are screwed in !!!

I don’t think I have enough thread showing to use the double nut method to remove it. Any suggestions if that is the case?

I know I can drill it out and use a stainless steel bolt and nut to replace it if need be but I’d like to avoid drilling. I know those studs are hard as hell and will take forever to drill out.


OP
Alain

Alain

Active Member
Member ID
#2176
Messages
166
Reactions
135
Likes
37
City
Haskell
State
NJ
Country
United States
Vehicle
2016 Challenger Hellcat
Thread Starter #5
I don't know if I would even change the gears from a 3.70 to a 3.90. My auto went from a 2.62 to 3.09 so enough I felt it was worth while
all of the input I’ve heard from guys who have gone to a 3.90 on their M6 has been positive.

im too far in to turn around now haha.


vortecd

Poster Club Hall of Fame
Premium Account
Donating Member
9 Second Best E/T
HFCOTM
Member ID
#1248
Messages
52,846
Reactions
175,141
Likes
402
City
Middleville
State
MI
Country
United States
Vehicle
2016 Charger Hellcat
#6
Just what I said with break away and heat vise grips. I would not use stainless. I used it before and it was all I could do to loosen the nut back off. I would buy some factory ones


vortecd

Poster Club Hall of Fame
Premium Account
Donating Member
9 Second Best E/T
HFCOTM
Member ID
#1248
Messages
52,846
Reactions
175,141
Likes
402
City
Middleville
State
MI
Country
United States
Vehicle
2016 Charger Hellcat
#7
all of the input I’ve heard from guys who have gone to a 3.90 on their M6 has been positive.

im too far in to turn around now haha.
On a stick may be different. I can't even tell I changed mine with an auto


OP
Alain

Alain

Active Member
Member ID
#2176
Messages
166
Reactions
135
Likes
37
City
Haskell
State
NJ
Country
United States
Vehicle
2016 Challenger Hellcat
Thread Starter #8
Just what I said with break away and heat. I would not use stainless. I used it before and it was all I could do to loosen the nut back off. I would buy some factory ones
Sorry about that, I was so excited to hear they were screwed in that I over looked your suggestion to heat it up for removal.
where exactly should I apply the heat?

Heat the actual stud? On the top or on the bottom (threaded portion)

Or heat the actual flange ?


vortecd

Poster Club Hall of Fame
Premium Account
Donating Member
9 Second Best E/T
HFCOTM
Member ID
#1248
Messages
52,846
Reactions
175,141
Likes
402
City
Middleville
State
MI
Country
United States
Vehicle
2016 Charger Hellcat
#9
Let it soak over night. If nothing then heat up the stud


OP
Alain

Alain

Active Member
Member ID
#2176
Messages
166
Reactions
135
Likes
37
City
Haskell
State
NJ
Country
United States
Vehicle
2016 Challenger Hellcat
Thread Starter #10
Let it soak over night. If nothing then heat up the stud
Roger that !
thank you sir.
I’ll report back.

gotta stop by the dealership and get me 4 new ones And replace all of them.
im amazed none of the other three snapped as well. Those suckers were on there pretty good !!


vortecd

Poster Club Hall of Fame
Premium Account
Donating Member
9 Second Best E/T
HFCOTM
Member ID
#1248
Messages
52,846
Reactions
175,141
Likes
402
City
Middleville
State
MI
Country
United States
Vehicle
2016 Charger Hellcat
#11
I would check to see if they will move first, no reason to break them also. A socket will fit on the end. Apply anti seize when putting it back together


DemonSRT

500 Posts Club
Donating Member
8 Second Best E/T
Member ID
#1457
Messages
560
Reactions
1,760
Likes
132
City
Kawartha Lakes
State
Non-US
Country
Canada
Vehicle
Built in Canada 2018 Demon #3135
#12
Sorry about that, I was so excited to hear they were screwed in that I over looked your suggestion to heat it up for removal.
where exactly should I apply the heat?

Heat the actual stud? On the top or on the bottom (threaded portion)

Or heat the actual flange ?
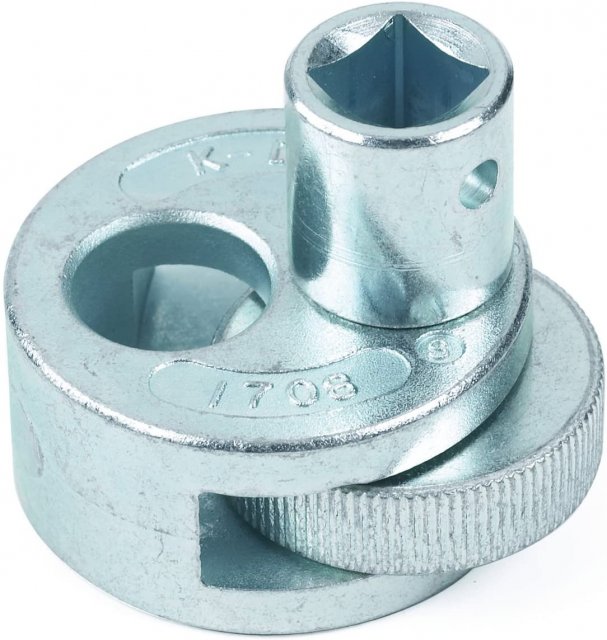
Put the heat to the flange not the stud. The idea is to expand the flange around the stud and then use a pair of vise gripes or a stud remover like in the picture. There are a few different types of stud removers available as well. If you use vise gripes, work the stud back and forth as it comes loose. Don't just reef it out as it could break.

71+UXFALT-L._AC_SL1414_.jpg


vortecd

Poster Club Hall of Fame
Premium Account
Donating Member
9 Second Best E/T
HFCOTM
Member ID
#1248
Messages
52,846
Reactions
175,141
Likes
402
City
Middleville
State
MI
Country
United States
Vehicle
2016 Charger Hellcat
#13
Put the heat to the flange not the stud. The idea is to expand the flange around the stud and then use a pair of vise gripes or a stud remover like in the picture. There are a few different types of stud removers available as well. If you use vise gripes, work the stud back and forth as it comes loose. Don't just reef it out as it could break.

View attachment 46571
I need one of those


OP
Alain

Alain

Active Member
Member ID
#2176
Messages
166
Reactions
135
Likes
37
City
Haskell
State
NJ
Country
United States
Vehicle
2016 Challenger Hellcat
Thread Starter #14
Put the heat to the flange not the stud. The idea is to expand the flange around the stud and then use a pair of vise gripes or a stud remover like in the picture. There are a few different types of stud removers available as well. If you use vise gripes, work the stud back and forth as it comes loose. Don't just reef it out as it could break.

View attachment 46571
I'm gonna soak it tonight when I get home from work and let it sit until tomorrow. I"ll try it with vise grips first. If they don't work out i'll get me one of these stud removers you posted or one of these


https://www.amazon.com/ARES-70016-D...jbGlja1JlZGlyZWN0JmRvTm90TG9nQ2xpY2s9dHJ1ZQ==


DemonSRT

500 Posts Club
Donating Member
8 Second Best E/T
Member ID
#1457
Messages
560
Reactions
1,760
Likes
132
City
Kawartha Lakes
State
Non-US
Country
Canada
Vehicle
Built in Canada 2018 Demon #3135
#15

Speedy!

Infomercial Producer
Staff Team
Founding Member
U.S. Marine Veteran
9 Second Best E/T
HFCOTM & HFCOTY
Member ID
#1070
Messages
6,581
Reactions
16,879
Likes
402
City
Interwebs
State
TN
Country
United States
Vehicle
Demon 170
#16
Yep, been there done that. Penetrating oil if that doesn't work heat the flange. Remember when you're trying to break the stud free you can turn it both directions. I bet it's gonna need some heat.


moparjim

1000 Posts Club
Founding Member
10 Second Best E/T
HFCOTM
Member ID
#1084
Messages
1,748
Reactions
4,352
Likes
212
City
Vaudreuil
State
Non-US
Country
Canada
Vehicle
2016 Challenger Hellcat
#17
@Alain when you heat the flange let it cool and heat it again. Do that 2 to 4 times and it will help with the death grip the flange and stud have together. I use this method mostly with rusted crap but if you broke a stud then it may help.


OP
Alain

Alain

Active Member
Member ID
#2176
Messages
166
Reactions
135
Likes
37
City
Haskell
State
NJ
Country
United States
Vehicle
2016 Challenger Hellcat
Thread Starter #18
Yep, been there done that. Penetrating oil if that doesn't work heat the flange. Remember when you're trying to break the stud free you can turn it both directions. I bet it's gonna need some heat.
@Alain when you heat the flange let it cool and heat it again. Do that 2 to 4 times and it will help with the death grip the flange and stud have together. I use this method mostly with rusted crap but if you broke a stud then it may help.
Thank you fellers. I'm hoping to avoid having to use any sort of heat. If I need to use heat, one of these Benzomatic should work correct?

BERNZOMATIC Adjustable Hand Torch W/ Cylinder, Propane, Instant On/Off, 3,450°F Propane Temp. - 52RM88|KC3500 - Grainger


OP
Alain

Alain

Active Member
Member ID
#2176
Messages
166
Reactions
135
Likes
37
City
Haskell
State
NJ
Country
United States
Vehicle
2016 Challenger Hellcat
Thread Starter #19
I can’t believe I never updated this thread !! I used heat on the flange like you guys suggested and a stud remover and it came out fairly easily.
want to update this in case someone is having the same issue and does a search.

thank you all for the help


Top